Users and groups
User management is where you add the people in your organization and organize them into groups. It has two tabs: Users and Groups.
Adding someone here creates their account. It does not yet give them access to a workspace, that is a separate step. See Workspace access on how to add users to a workspaces.
Roles are managed from this screen as well, with the Manage roles button in the topbar. See Roles and permissions on how to setup roles and what permissions they should have.
The Users tab
The Users table lists everyone in your organization:
| Column | What it shows |
|---|---|
| User | Their username |
| Accessible workspaces | The workspaces they can open, or All for a super admin |
| Groups | The groups they belong to, or All for a super admin |
| Type | Super admin or Regular user |
| Creation date | When the account was created |
Adding a user
Open the add modal user by clicking on Create and then chooising User
- Choose the Authentication method. Which options you see depends on what your organization allows: Username + password, Single Sign-On (SSO), or both. See Authentication.
- Fill in the Email and User name. Both have to be unique.
- For a username and password account, either set an initial Password and confirm it.
- Optionally add them to one or more Groups.
- Create user.
Passwords you set must be at least 6 characters and include an uppercase letter, a lowercase letter, a number, and a special character.
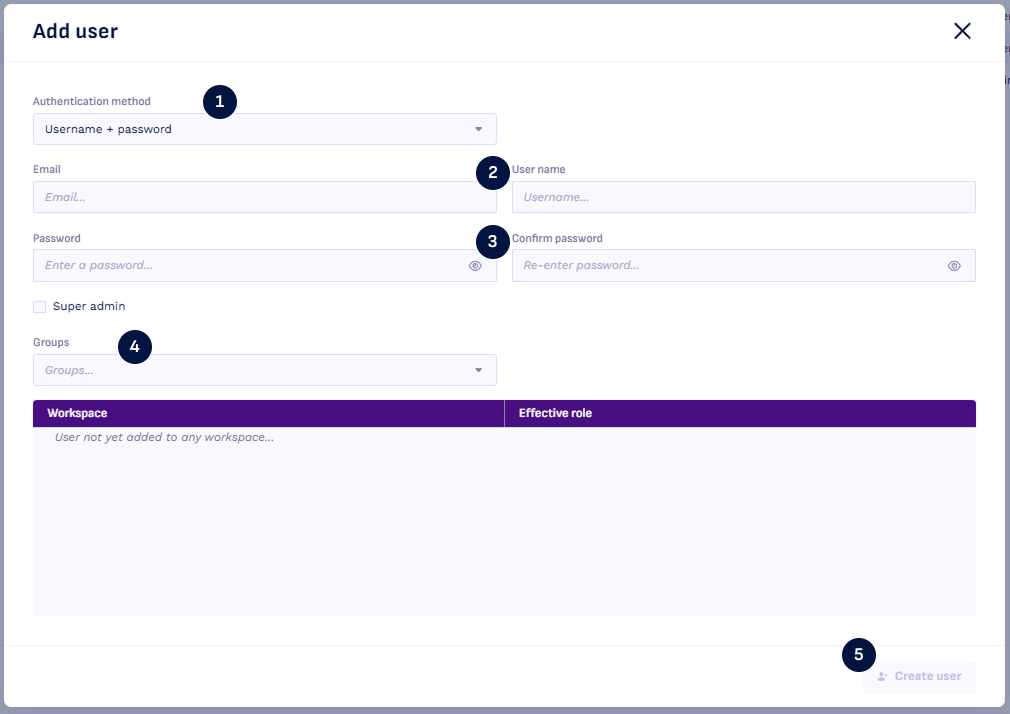
Every account uses a seat on your license. If you run out, Konekti tells you the maximum number of users has been reached and the account is not created.
How the user will sign in
This depends on how you created the account:
- Username and password, password set by you: You pass the password on to them yourself, they wil then have to login in with that information.
- Single Sign-On: no email is sent and no password is needed. They sign in through your identity provider.
Editing a user
Select a row in the Users table to open someone's details, make changes, then choose Save changes.
Their details also show which workspaces they can reach and the role they have in each, so you can check someone's access without leaving the screen.
Two things worth knowing:
- Changing someone's email means they have to confirm the new address before they can sign in again.
- Copy password reset link gives you a link to send to someone who cannot sign in. It is only available for username and password accounts, because people who sign in with SSO do not have a Konekti password.
Super admins
A super admin manages the whole organization: users, groups, roles, workspaces, and sign-in settings. They also have full access to every workspace automatically, which is why they are never given workspace roles and cannot be added to groups.
You make someone a super admin with the Super admin checkbox in their details.
Removing a user
Open the person's details and choose Delete user, then confirm. To remove several people at once, switch on Bulk edit in the Users tab, select them, and delete. Super admins cannot be selected in bulk.
Groups
A group is a set of people who need the same access. Instead of giving ten people a role in a workspace one by one, you put them in a group and add that group to the workspace with a specific role. Anyone you add to the group picks up its access, and anyone you remove loses it.
The Groups tab lists your groups with the workspaces they can reach, how many members they have, and when they were created.
To create one:
Open the Groups tab by clicking Create, then choose Group.
- Give the group a Group name and, optionally, a Group description.
- Add Members.
- Create group.
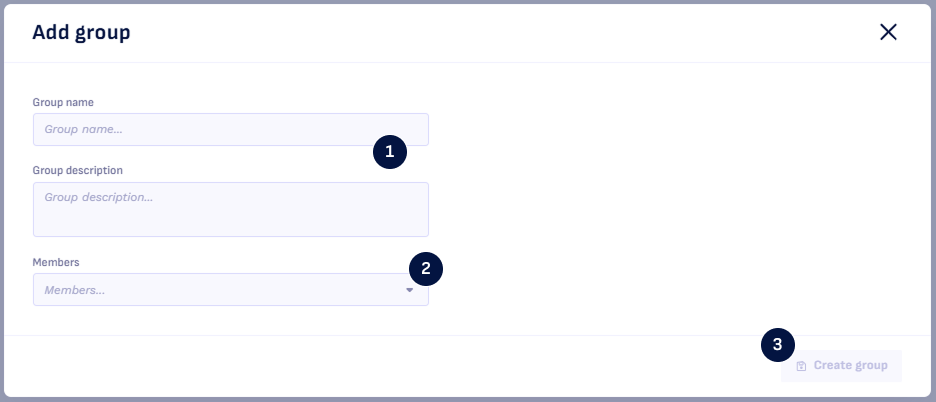
Select any group to edit it, change its members, or delete it. Opening an existing group also shows which workspaces it can reach and the role it has in each.