Roles and permissions
A role is a set of permissions. You can give someone a role when adding them to a workspace, the role decides what they can do in that workspace.
How access works
Someone with no role in a workspace cannot open it. Someone with a role can do what that role's permissions allow.
Super admins are the exception. They manage the organization and already have full access everywhere, so they are never given workspace roles.
Konekti supplies a workspace role called Admin, and it is not the same thing as a super admin. The Admin role only grants permissions inside the workspaces where it has been assigned. It does not let anyone manage users, roles, or organization settings.
What a permission covers
A permission is one action on one type of item. Konekti has five types:
- Objects
- Activities
- Processes
- Sources
- Exports
For each type, a role can allow Create, Read, Update, and Delete (CRUD). You can configure these permissions independently for each type. For example, you might grant Read-only access on Objects, while allowing full Create, Read, Update, and Delete access on Sources
Three rules apply while you build a role:
- Choosing Create, Update, or Delete automatically adds Read and keeps it selected. A user cannot change something they are not allowed to see.
- A role has to grant at least one permission before you can save it.
- A role must have an unique name
The roles Konekti supplies
Konekti comes with four roles so you have something to work with right away:
| Viewer | Contributor | Owner | Admin | |
|---|---|---|---|---|
| Objects | Read | Create, read, update | All | All |
| Activities | Read | Create, read, update | All | All |
| Processes | Read | Create, read, update | All | All |
| Sources | Read | Read | Read | All |
| Exports | Read | Create, read, update | All | All |
All means create, read, update, and delete.
The practical difference: a Contributor can build assets but not delete them, an Owner can delete as well, and an Admin can manage the workspace's Sources on top of that.
These four are a starting point, not a fixed list. You can rename them, change what they allow, or delete them. You can create any number of new roles.
Creating and editing roles
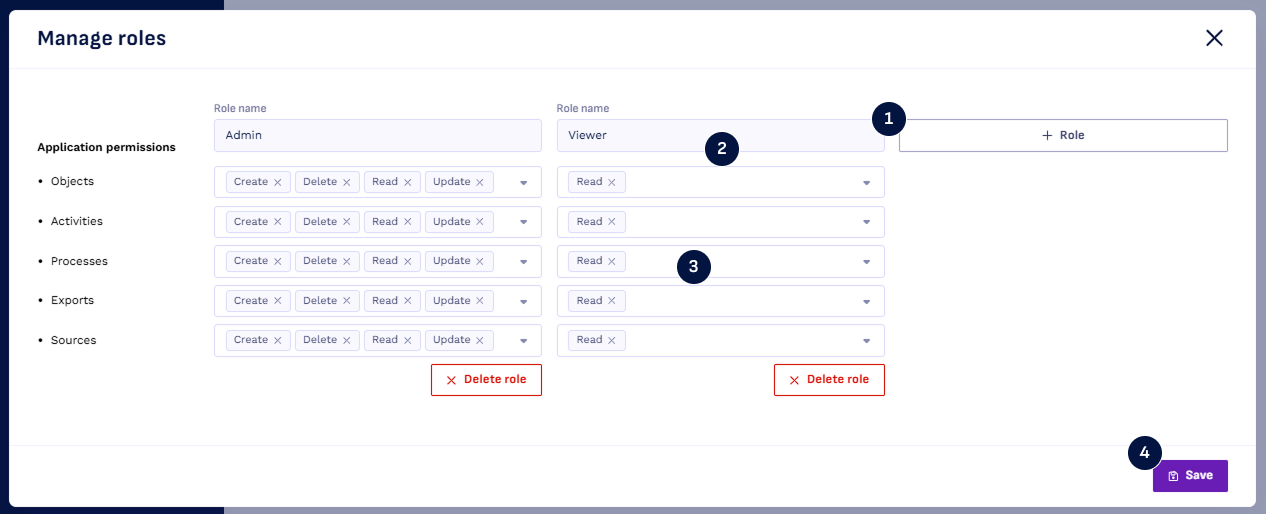
Go to User management and select Manage roles.
- Add a new role, or select an existing one to change it.
- Give it a Role name. Names have to be unique.
- Under Application permissions, choose the actions the role allows for each of the five item types.
- Select Save.
Saving applies every change you made on this screen at once, including changes to other roles.
Each role shows how many users, groups, and workspaces currently use it. That is a quick way to see what a change will affect before you make it.
Deleting a role
Deleting a role takes that access away from everyone who has it. Every user and group assigned the role loses their rights in the workspaces where it was used, and this cannot be undone. Check the usage counts on the role before deleting it.
How someone gets a role
There are two ways, and they work together:
- Directly. You give a users a role in a workspace. Someone can hold one direct role per workspace.
- Through a group. You give a group a role in a workspace, and everyone in that group gets it.
If both apply, the person gets everything both roles allow, added together. Someone in three groups that each hold a role in the same workspace gets all three sets of permissions.
You assign roles from the workspace itself. See Workspace access.
Role changes take effect straight away. Nobody has to sign out and back in for a new permission to start working, or for a removed one to stop.
Checking what someone can do
To see where a person or group has access, open them from User management. Their details list every workspace they can reach and their effect role inside of it.
Keep in mind that when someone picks up roles through more than one group, what they can actually do is the combination of all of those roles.