4. Advanced modeling
This tutorial uses the more advanced modeling features. The blueprint you loaded in tutorial 3 is missing the Order object, so Order item has nothing to relate to. You rebuild Order and on the way use:
- An advanced join key.
- A combined source.
- An activity batch.
- A calculated attribute.
- A parameter.
Step 0: Prepare your second training workspace
If you just completed In depth processes, keep working in the same workspace and go to Step 1. Otherwise, follow step 0 and step 1 of In depth processes first.
Step 1: Create the Order object
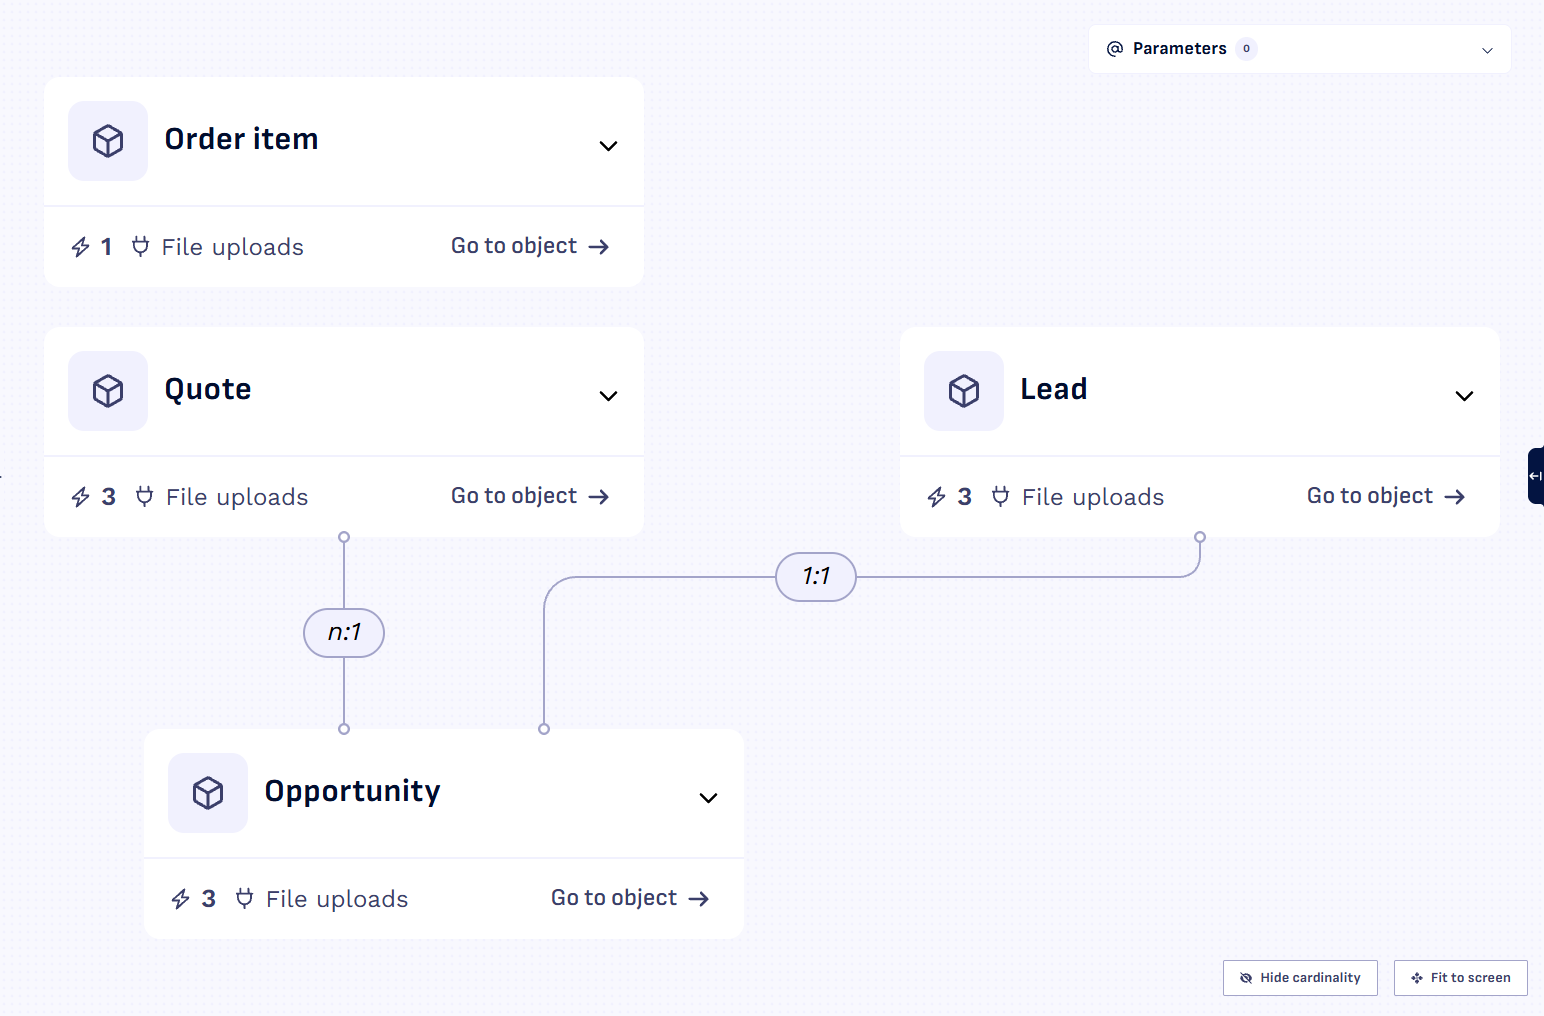
Select Dashboard in the sidebar. Order item has no relations because Order is missing.
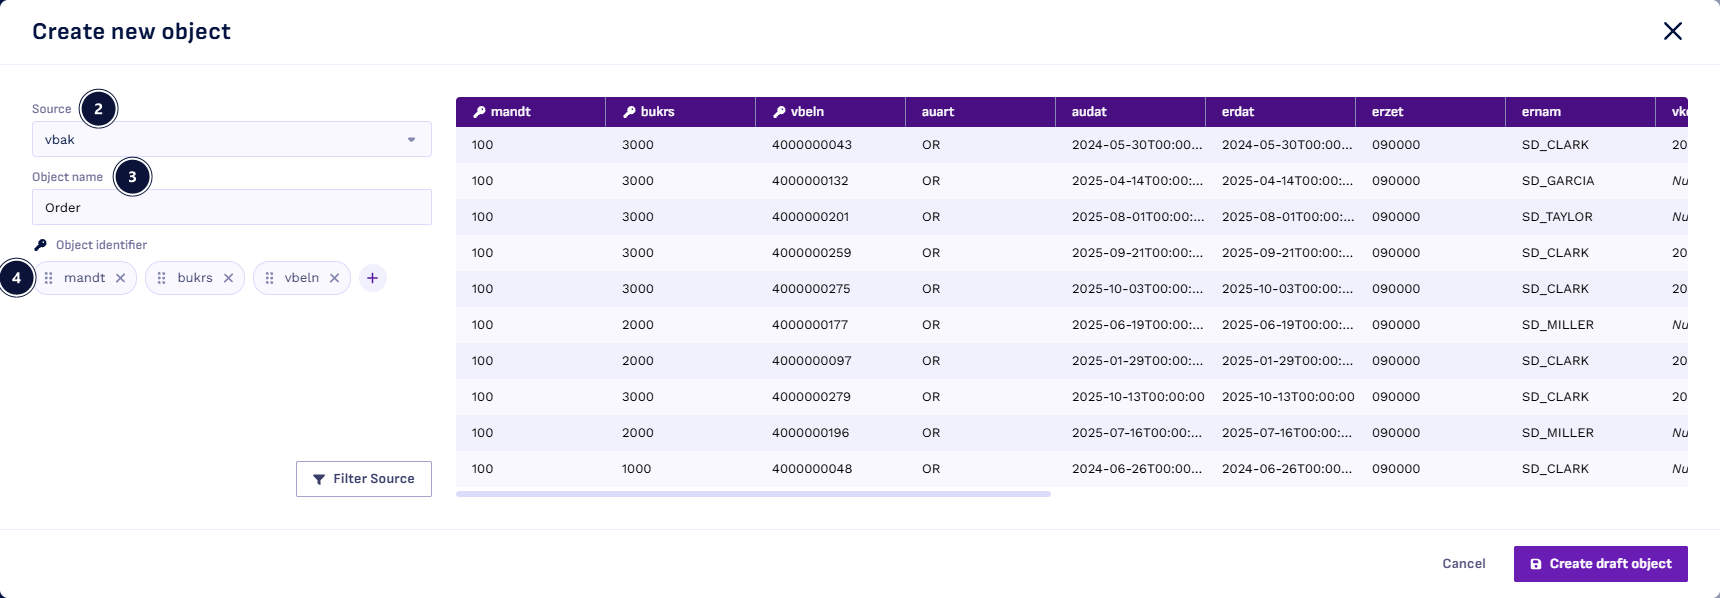
- Select Event store in the sidebar, then + Object.
- For Source, choose File uploads →
vbak. - Enter Order as the Object name.
- For Object identifier, select
mandt, then use + to addbukrsandvbeln. - Select Create draft object.
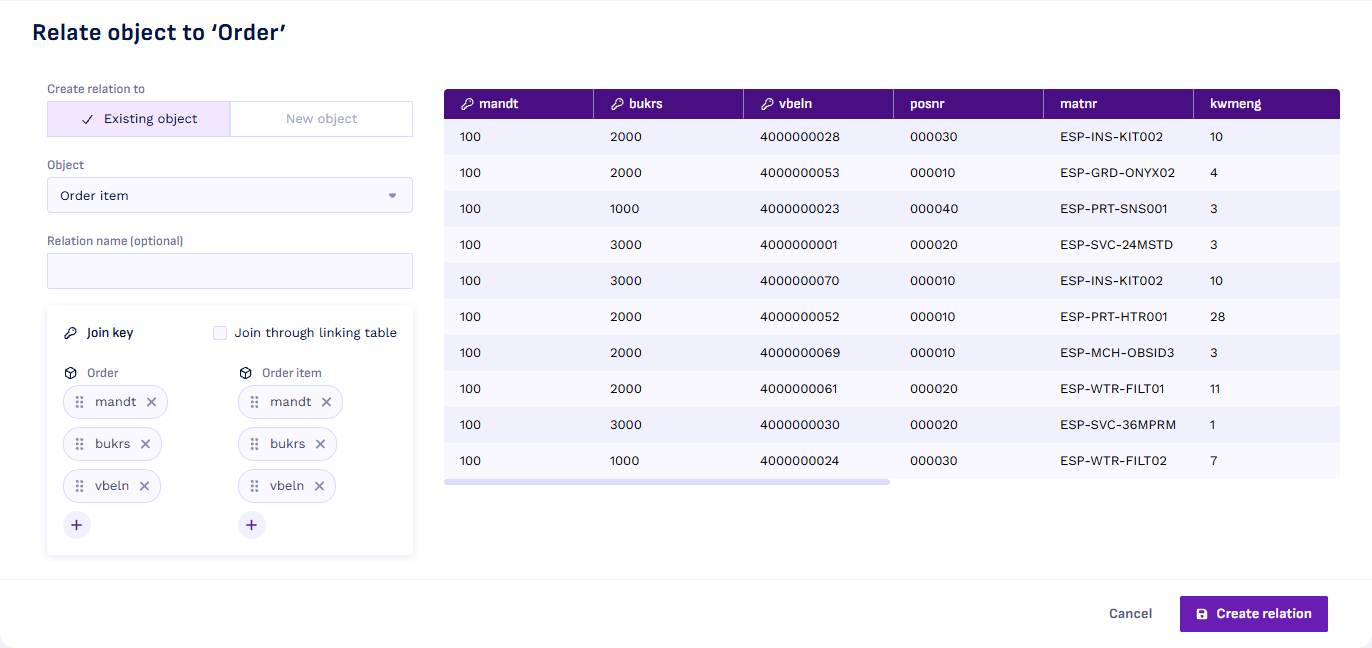
Order needs relations to Order item and Quote. Start with Order item, which joins on the same three columns.
- In the Related objects panel, select + Related object.
- Under Object, choose Order item.
- Add
mandt,bukrsandvbelnas join keys under Order, and the same three columns under Order item. - Select Create relation.
Quote is harder: the order stores the quote id in bstnk with extra characters after it.
An advanced join key uses only the first 18 characters.
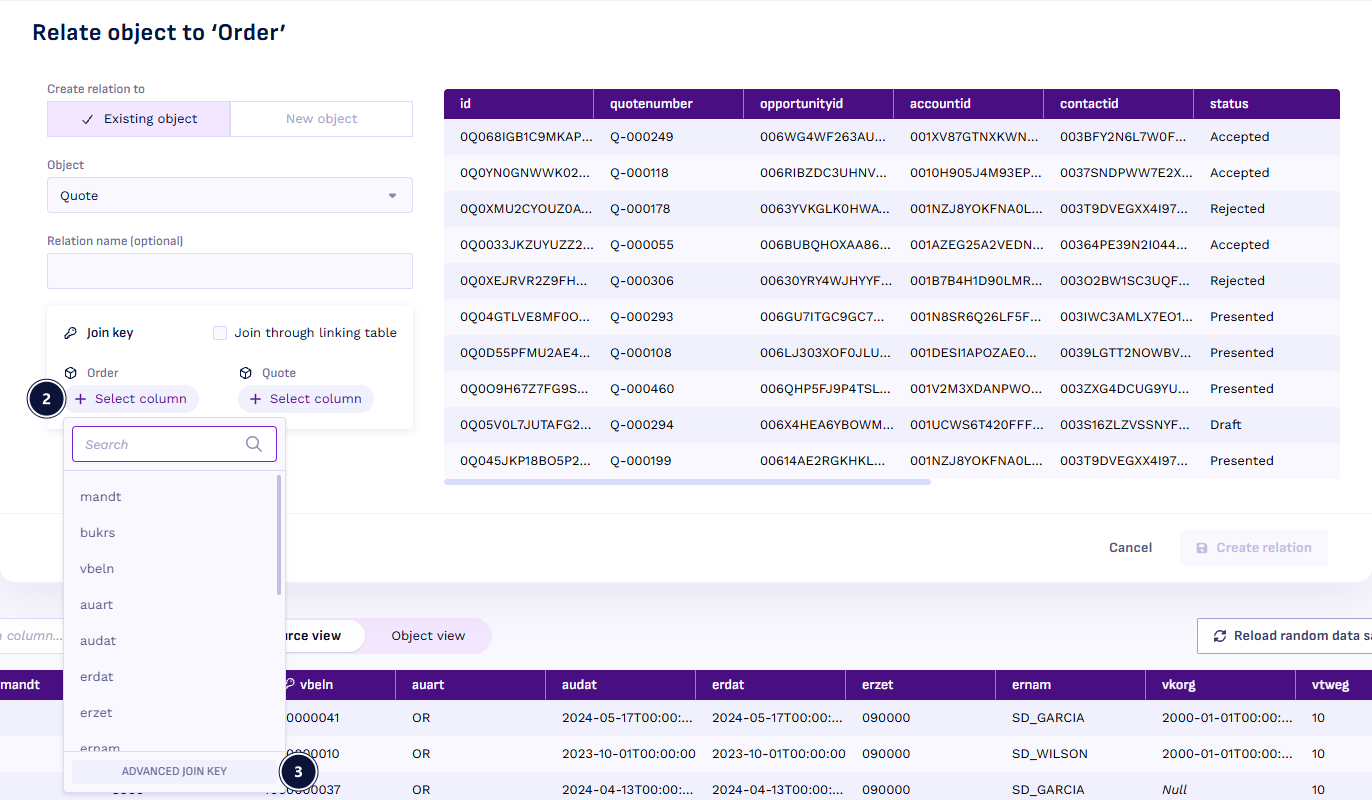
- Select + Related object again and choose Quote under Object.
- Under Order, select Select column.
- Select ADVANCED JOIN KEY at the bottom of the list.
- Set Type to Left characters.
- Set Column to
bstnk. - Enter 18 for # characters.
- Select Save.
- Under Quote, choose
id. - Select Create relation.
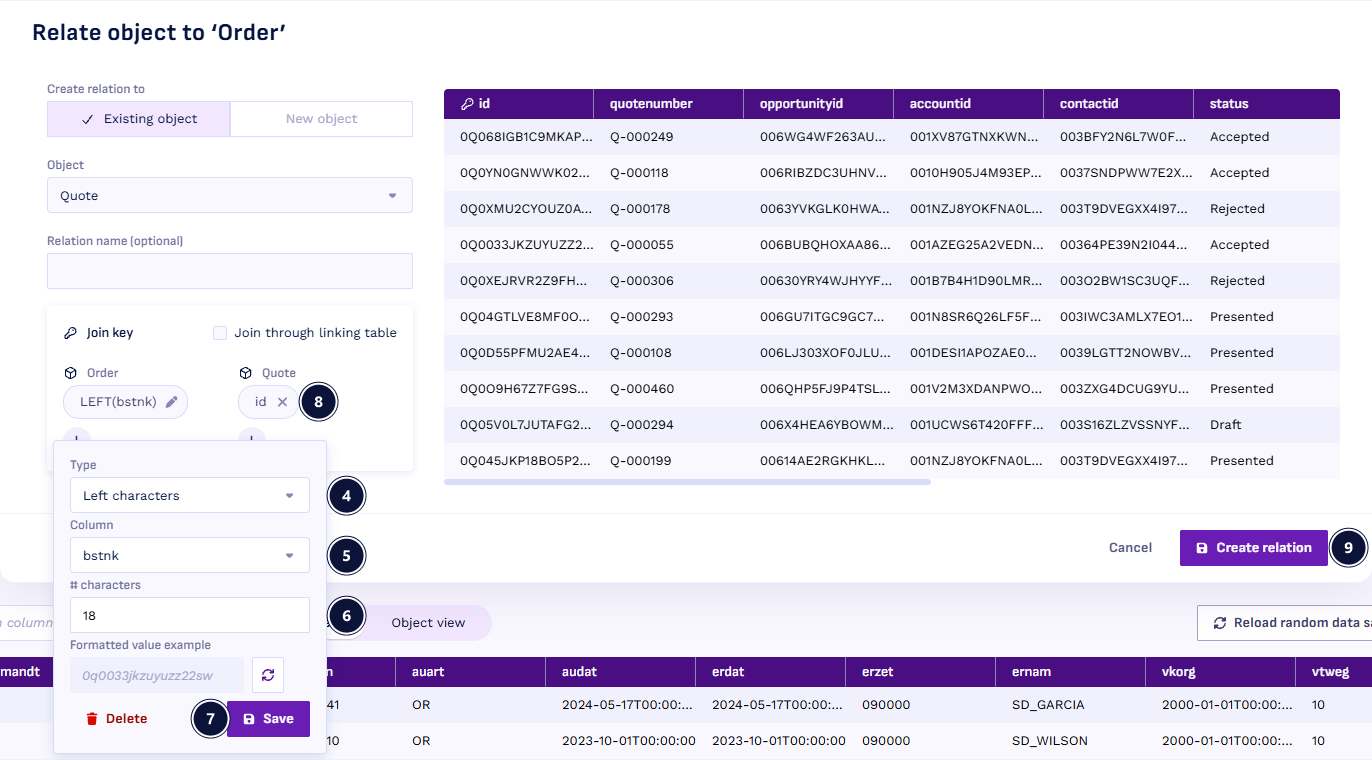
The preview table shows the selected object, here Quote. The table at the bottom shows Order. Hover over a column in either table to add it as a join key.
To check the relations, process the three objects:
- On Order, select Save & process.
- Open Order item from the Related objects panel and select Reprocess changes.
- Open Quote and select Reprocess changes.
Step 2: Create a combined source
The activity batch in the next step needs the changed field fname and the change date
udate in one table, but they live in cdpos and cdhdr. A combined source joins them.
- Select Sources in the sidebar, then + Source → Combined source.
- Enter
changesas the Name. Combined source names must start with a lowercase letter. - Choose
cdposas the first table. - In Columns, select Select all.
- Select Save.
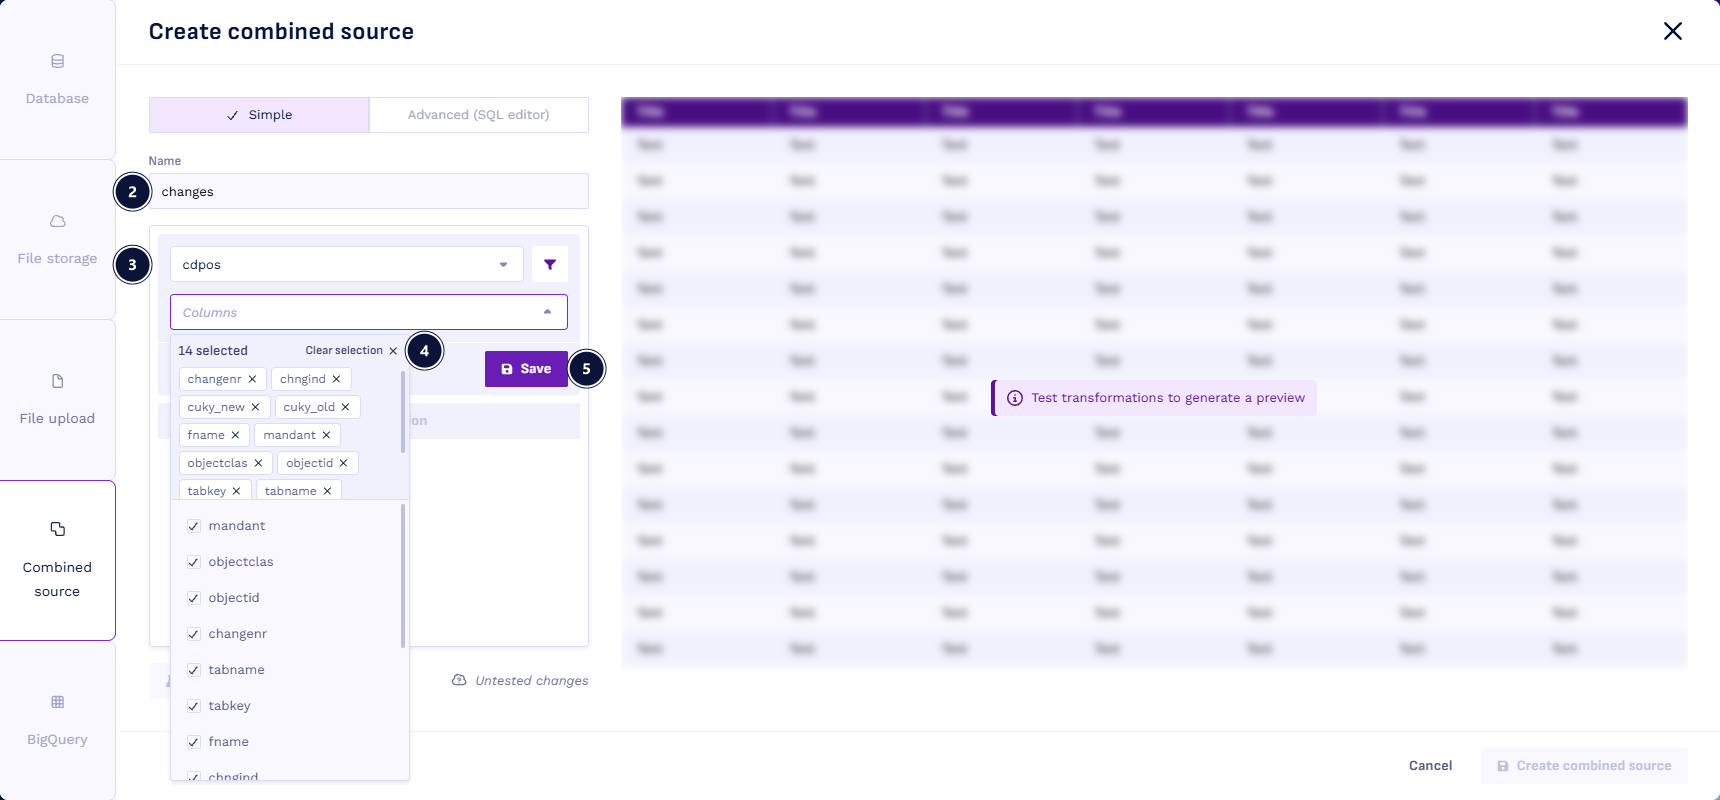
Now add the change date from cdhdr:
- Select + Transformation and set Operation type to Left join.
- Choose
cdhdras the table. - In Columns, choose
udate. - Add the join keys:
mandantandchangenrunder Combined table, andmandtandchangenrunder cdhdr. - Select Apply.
- Select Test transformations and check the preview.
- Select Create combined source.
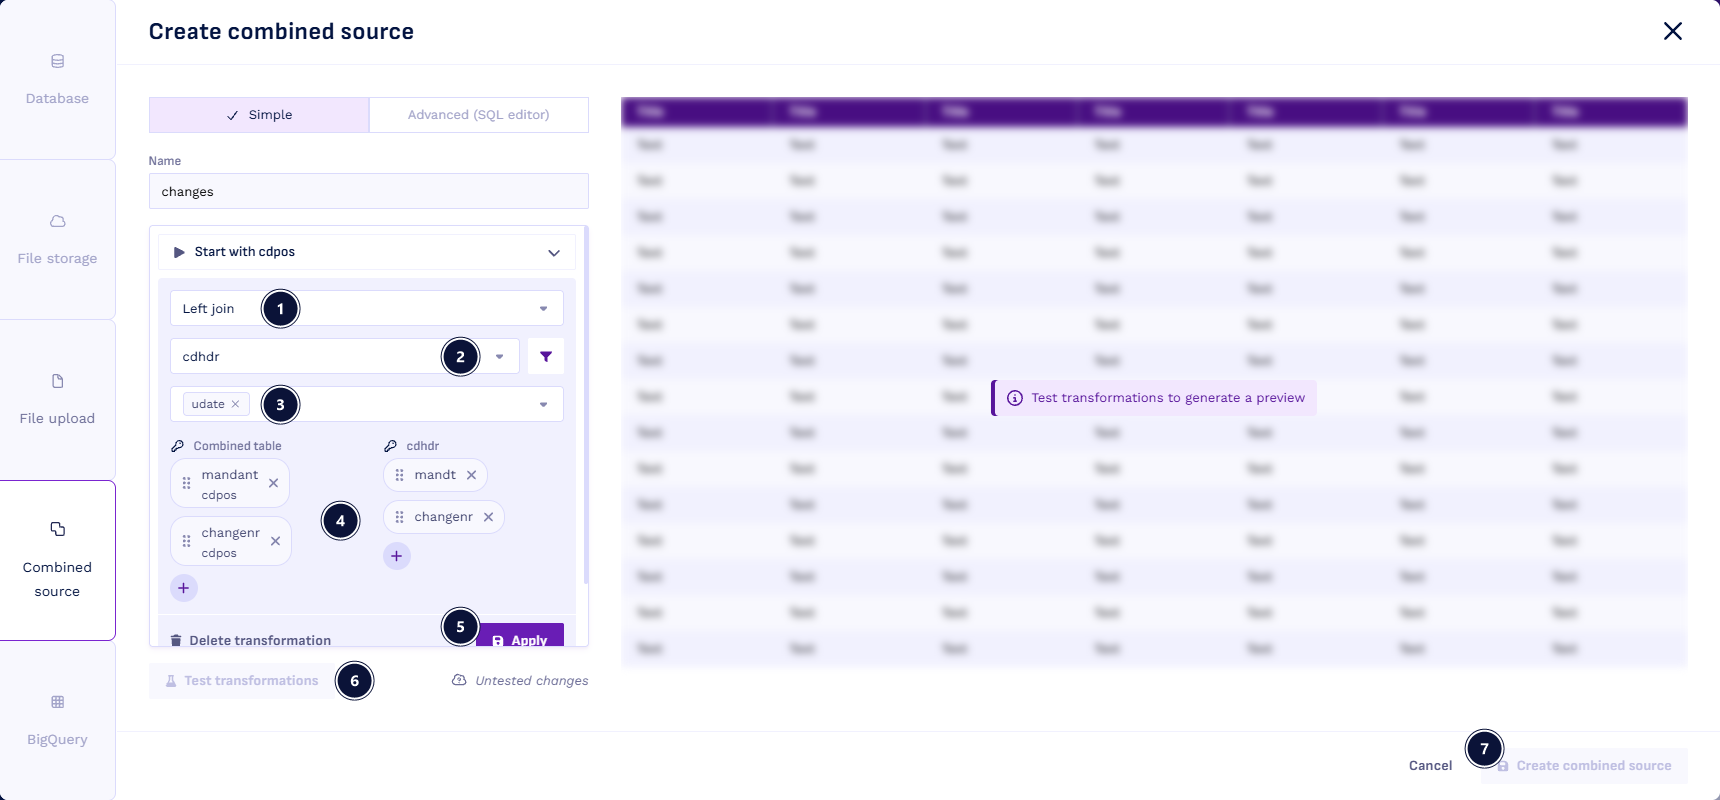
Only updates are needed, the rows where chngind is U. You add that filter in SQL.
- Select changes in the source list.
- Switch to Advanced (SQL editor).
- Add this line at the end of the query:
WHERE main.chngind = 'U'
- Select Test SQL and check that
chngindonly showsU. - Select Save combined source.
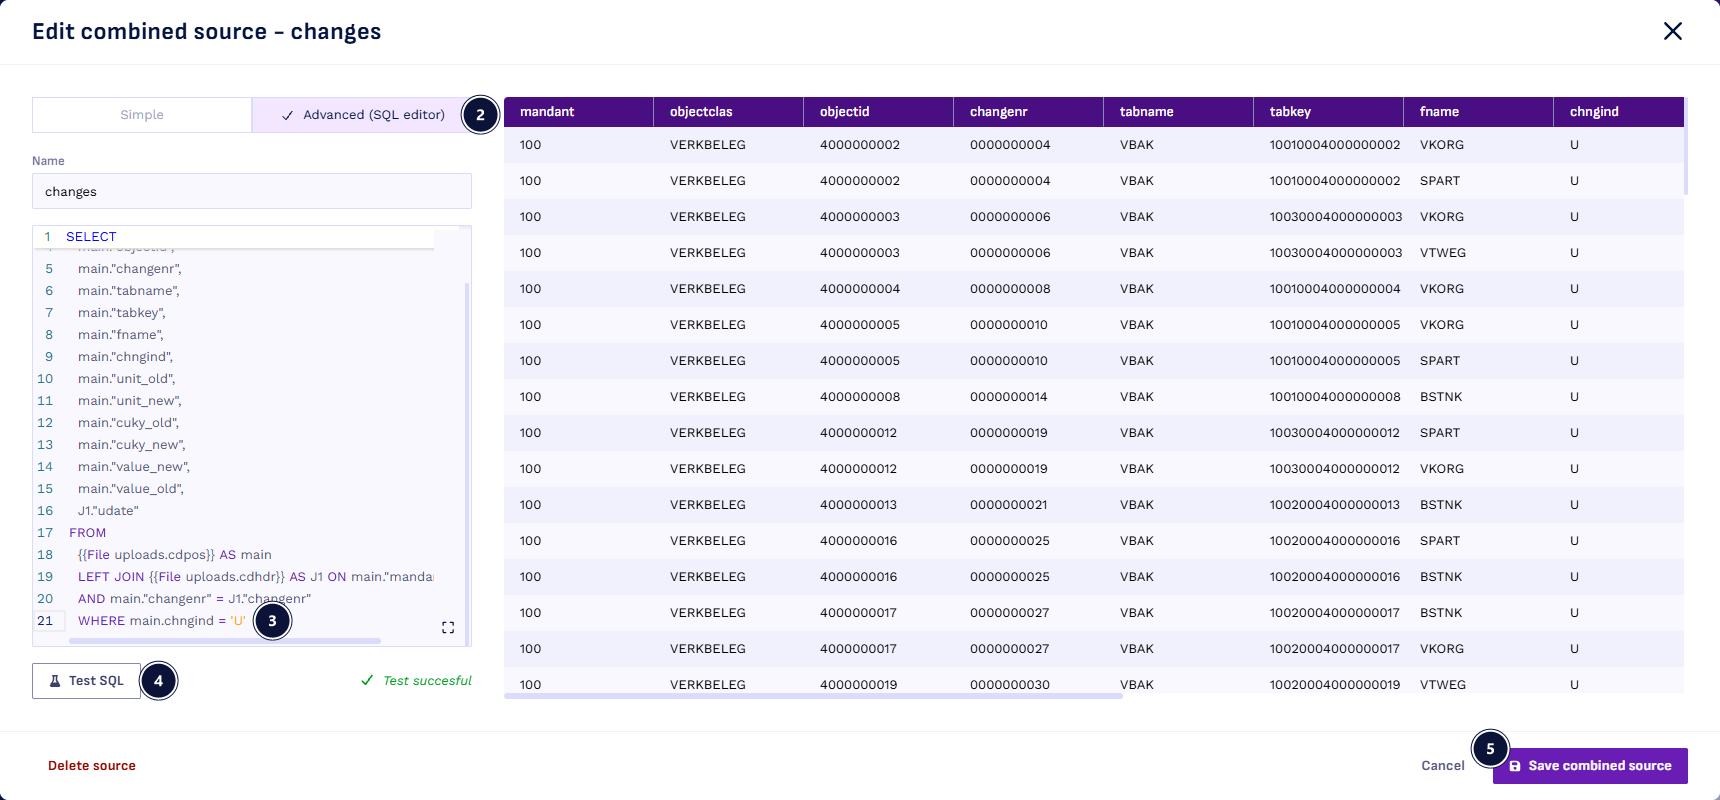
Step 3: Create an activity batch
An activity batch creates one activity per value of a column, here one activity per changed field.
- Open Order in the Event store and select + Activity in the Activities panel.
- Select the Activity batch icon next to Batch name.
- Enter Change order as the Batch name.
- For Source, choose Combined sources →
changes. - For Timestamp, choose
udate. - In Dynamic activity name, type Change, then type
$and choosefname. The example below the field shows a name such as Change SPART. - Add the join keys:
mandt,bukrsandvbelnunder Order, andtabkeyunder Change order. - Select Create activity batch.
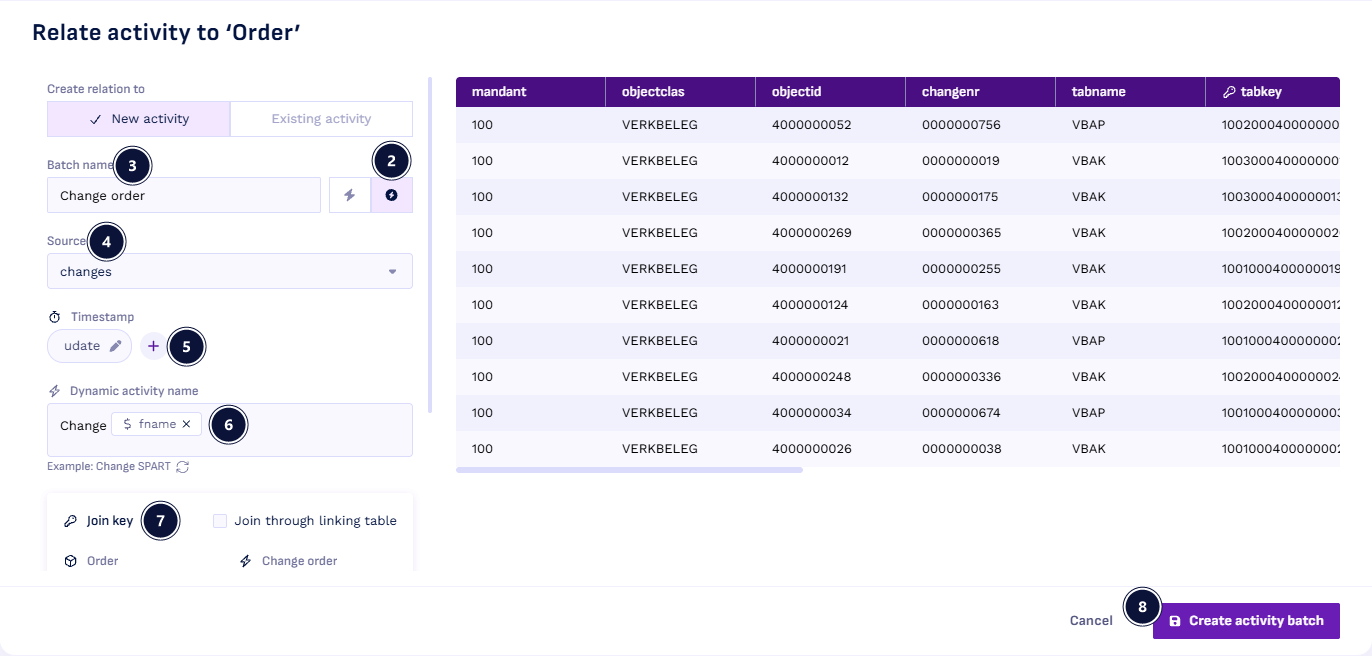
The batch also picks up changes to other tables. Keep only changes to the order header,
VBAK:
- Select Change order in the Activities panel of Order.
- In the Batch filter panel, select Filter.
- Choose
tabname. - Choose Equals.
- Enter
VBAK. - Select Save filters. Konekti asks to recompute the activities; select Yes.
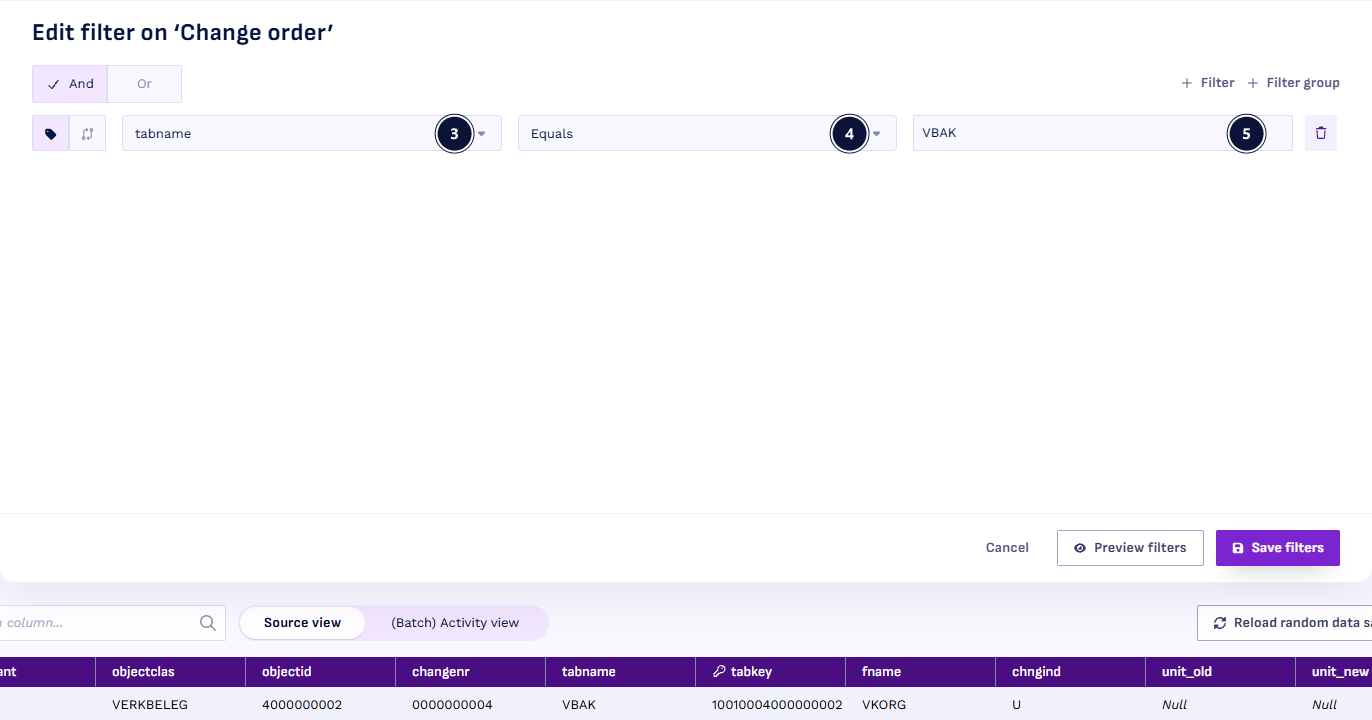
The batch now has six activities. Two of them are not needed:
- In the Batch activities panel, select Activity settings. The Configure batch activities dialog opens.
- Select the bin icon next to Change ABGRU and confirm with Delete.
- Do the same for Change LIFSK.
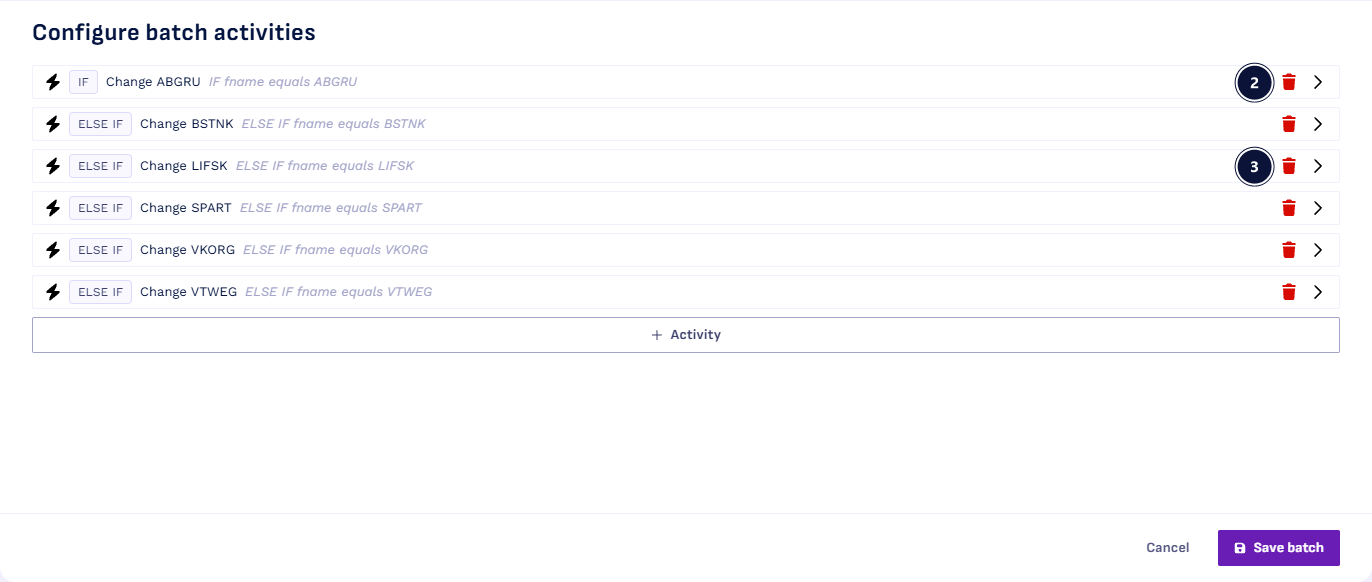
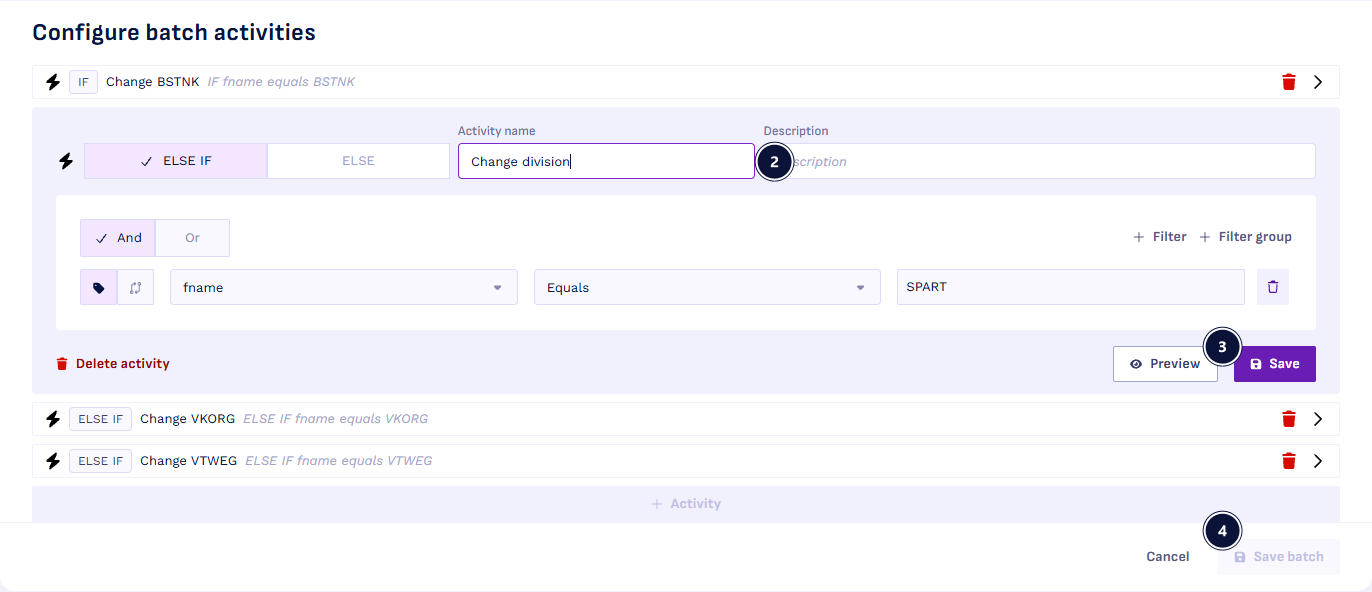
The activities are named after fname. Give Change SPART a readable name:
- Select the chevron next to Change SPART.
- Change Activity name to Change division.
- Select Save.
- Select Save batch.
- Select Save & process.
Step 4: Add a calculated attribute
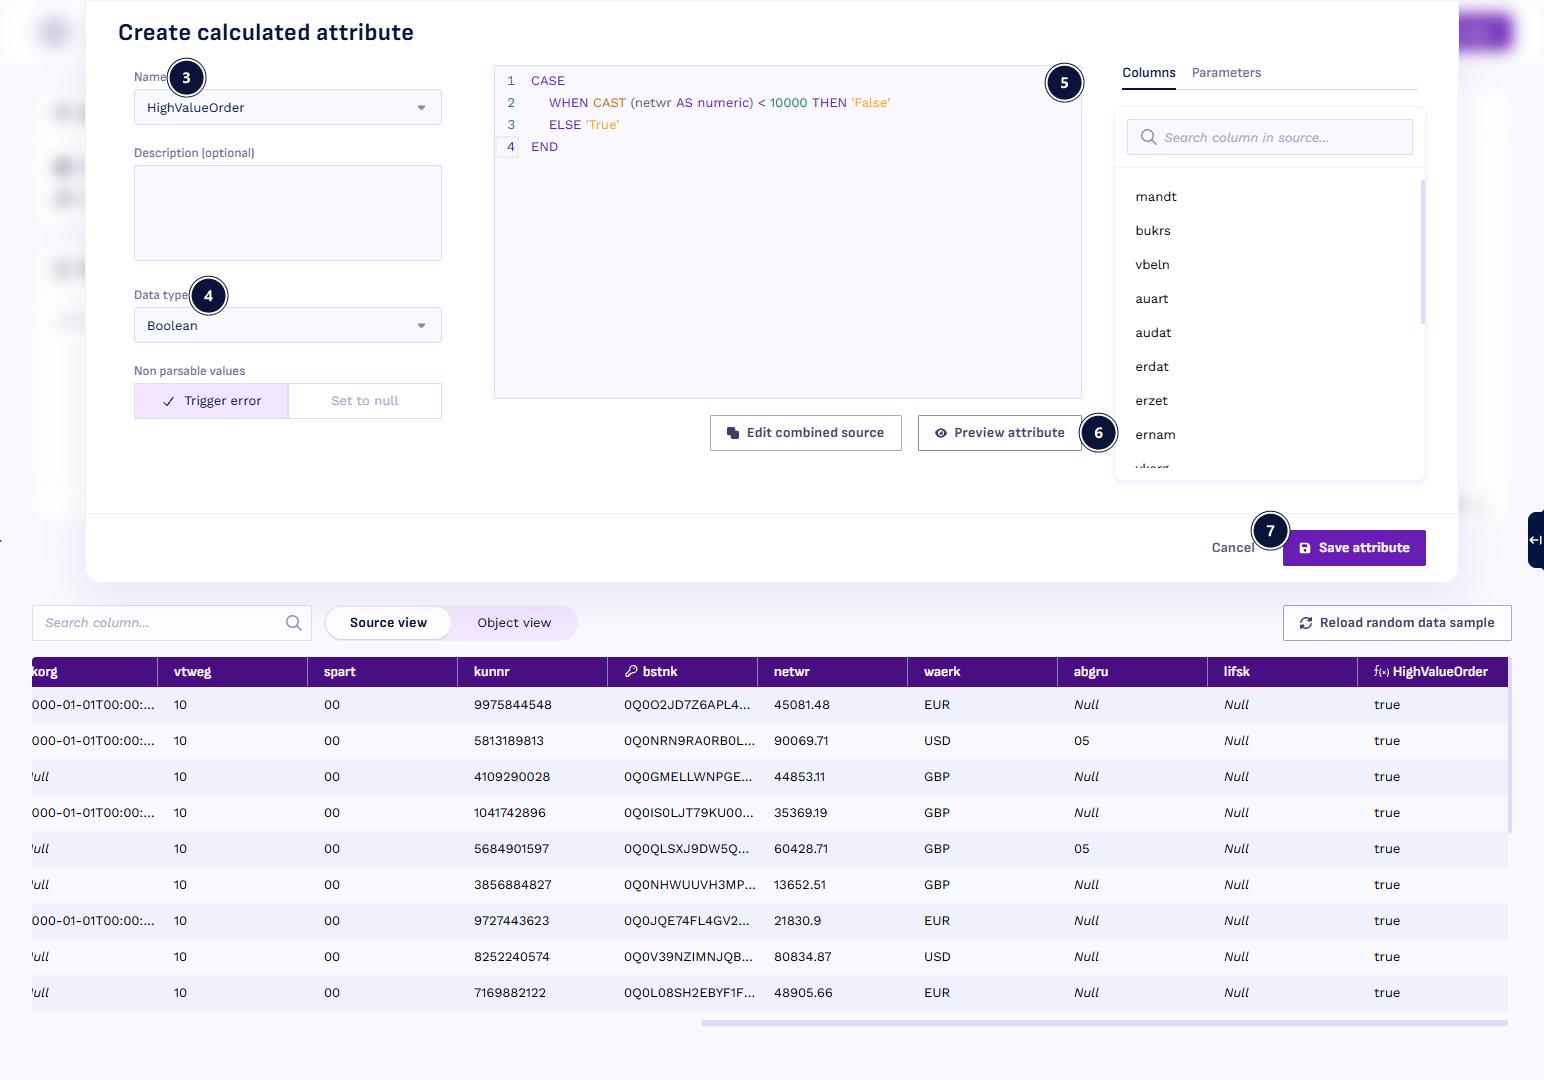
A calculated attribute is computed with SQL instead of read from a column. Here it marks orders with a net value of 10,000 or more.
- Open Order in the Event store.
- In the Attributes panel, open Select attributes and choose Calculated attribute at the bottom of the list.
- Type HighValueOrder in Name and select Add "HighValueOrder".
- Set Data type to Boolean.
- Copy this code into the editor:
CASE
    WHEN CAST (netwr AS numeric) < 10000 THEN 'False'
    ELSE 'True'
END
- Select Preview attribute and check the new column in the table.
- Select Save attribute.
Step 5: Add a filter
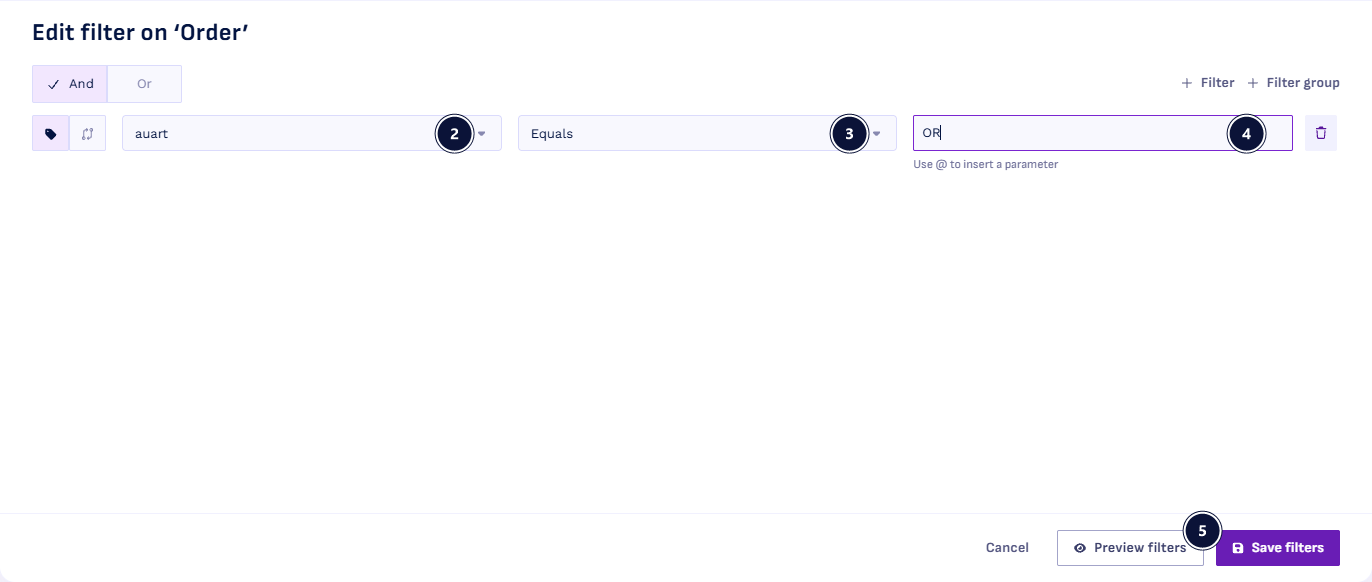
Order should only include sales orders, where auart is OR.
- In the Filters panel of Order, select Filter.
- Choose
auart. - Choose Equals.
- Enter
OR. - Select Save filters.
Step 6: Add a parameter and use it in the filter
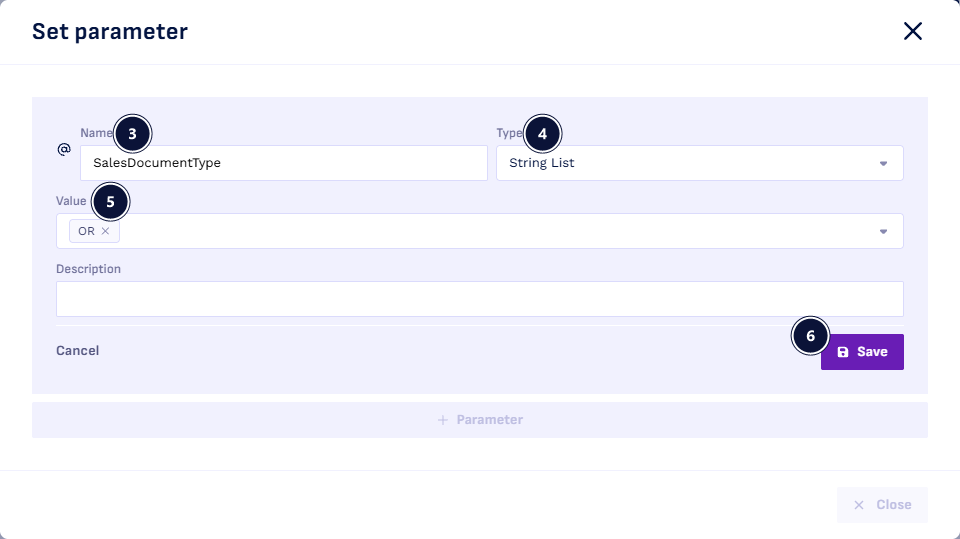
A parameter holds a value you can use in many filters and change in one place.
- Select Dashboard in the sidebar.
- In the Parameters panel, select + Parameter. The Set parameter dialog opens.
- Enter SalesDocumentType as the Name.
- Set Type to
String List. - In Value, type
ORand add it. - Select Save, then Close.
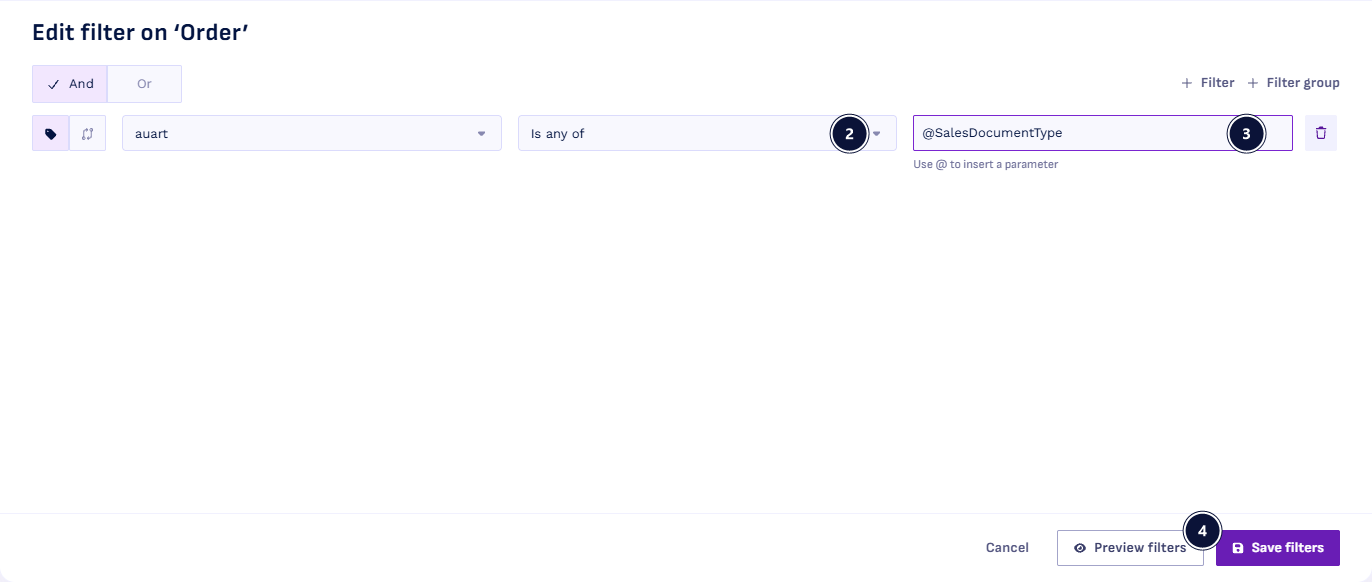
Now replace the fixed value in the Order filter with the parameter:
- Open Order in the Event store and select Filter.
- Change the operator to General comparators → Is any of.
- In the value field, type
@and choose SalesDocumentType. - Select Save filters.
- Select Reprocess changes.
You have now used the advanced modeling features on a full example. For help with your own data, contact support.